Your own Workflow in Azure DevOps
For a long time your workflow customization inside Azure DevOps was limited to choosing one of the pre-defined process templates. All other forms of customization you could do with the on-premises installation of TFS where not possible in Azure DevOps (or Visual Studio Team Services for those who are more familiar with the old name).
This limitation is now history and you can modify your workflow as much as you like. However, without a backup solution for your work items this task can end in a terrible mess. Before you change anything, at least connect with Visual Studio to your work items and export everything to an Excel sheet.
Process templates to choose from
The three default processes you can choose from are Agile, CMMI (Capability Maturity Model Integration) and Scrum. These process templates define the types of work item and the states you can use.

Customizing your workflow
Customizing the workflow takes many steps and it may be only a few week until the screens here are outdated. Therefore, check the official documentation should the screens no longer match.
You start with the customization at the organisation level, where you find all your organisations and projects you can access. The link for "Organization setting" is in the left bottom part of the navigation:

Clicking on that link slides out the "Organization Setting" navigation, where you find your processes in the Boards section:

You cannot change the default templates, but you can inherit your own process from one of the basic templates:

Attention: You can only use your inherited process with projects using the parent process. It is currently not possible to switch from Agile to Scrum or CMMI.
I created one named "myProcess" and when you open your inherited process, you should see the list of work item types:

Here starts the more "special" part of the customization where we can look behind the curtains of the Azure DevOps UI. There is not one single Kanban board in your projects; there is one for each type of work item. This gives you the flexibility to have different board layouts depending on the type of work, but it comes with the extra work to apply the next steps to each and every work item type to have coherent layout in all your boards.
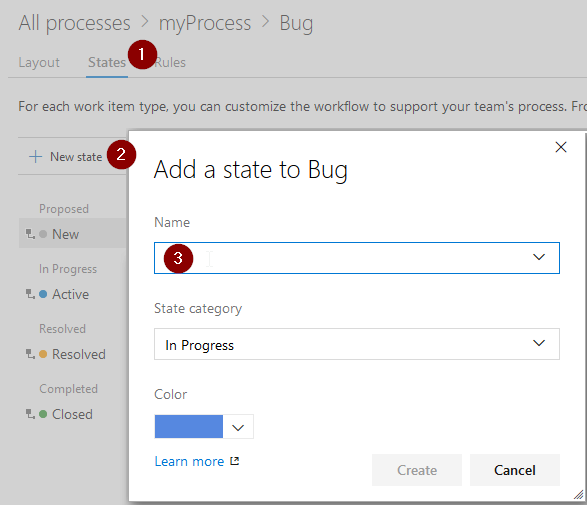
Select the first work item type and click on "States" (1), "New state" (2) and enter the name of the new state (3):
Save the new state, go back to the inherited process and repeat these steps for all other work item types.
You now have a new process template that has all the changes. The final step is to use this process with your existing projects. Go back to the process overview (the one including the three default templates and your new one), select your new process and choose "Change team projects to use myProcess" in the menu and then move the projects down to your new process:

Changing the Kanban boards
You now can select the new state in your work items. If you want to drag your items on your board and they should be set automatically to your new state, then you need to update your Kanban boards as well. For that, open your project, go to the Boards menu and select "configure team settings":

Scroll down to the Columns entry (1), add a new column (2) and scroll down in the details until you can set the state mapping (3) to your newly created state:

You need to repeat this again for all work item types you can select in the board overview.
Use your new workflow state
You can now use your new workflow state like the ones from the initial template and everything works as expected.
Conclusion
Customizing your workflow in Azure DevOps is a lot of work but it is worthwhile to have your tools supporting your process. You should try the first steps with a demo project and make the errors there – it is a lot simpler to reassign states to a few work items than to hundreds.