How to Create Self-Signed Client-Side SSL Certificates That Work
Creating a client-side SSL certificate that you can use to log in on a web site is a challenge. Every part from your certificate to the settings in your web application must work together or you only get an error message. You may have created SSL server certificates without any problems, but believe me, client certificates are another beast.
Whenever I need to create client certificates to log in for testing purposes, I go to the GitHub Gist from Mike Tigas. He wrote down all the commands you need for the most common use-cases. Even if you are in a hurry, you should take the time to read his comments. They can help you to better understand why you need to do things in a certain way – and it must be that way, or nothing will work.
Here are the commands I used to create my certificates for my last test. You need OpenSSL and I suggest you install it with Chocolatey if you use Windows. The commands here work with PowerShell, for Linux you can use the commands as they are written down in the Gist.
Create a certificate for your certificate authority
First we need to create a key for our certificate authority (CA) certificate. We need our own CA so that our web server knows which certificates are trustworthy.
openssl genrsa -aes256 -passout pass:xxxx -out ca.pass.key 4096
openssl rsa -passin pass:xxxx -in ca.pass.key -out ca.key
rm ca.pass.key
The next command creates the certificate for the CA based on our newly created keys. The creation wizard asks a few questions about your CA. You can enter what you want, but it will be simpler to find the certificate if it contains some clues about the project for which you created it.
Create a user certificate
With our CA certificate in place, we now create a key for our user:
openssl genrsa -aes256 -passout pass:xxxx -out 01-alice.pass.key 4096
openssl rsa -passin pass:xxxx -in 01-alice.pass.key -out 01-alice.key
rm 01-alice.pass.key
To create the user certificate with our CA, we again need to enter some details and set a password:
openssl req -new -key 01-alice.key -out 01-alice.csr
openssl x509 -req -days 3650 -in 01-alice.csr -CA ca.pem -CAkey ca.key -set_serial 01 -out 01-alice.pem
If your server needs a pem file with key, certificate and the CA certificate, you can run this command (for IIS and IIS Express you can skip this step):
As the last command we create a *.pfx file with our certificate and its private key. To protect this private key, we need to set a password. The same password will be needed to import this certificate into your browser.
Import the certificates at the right place
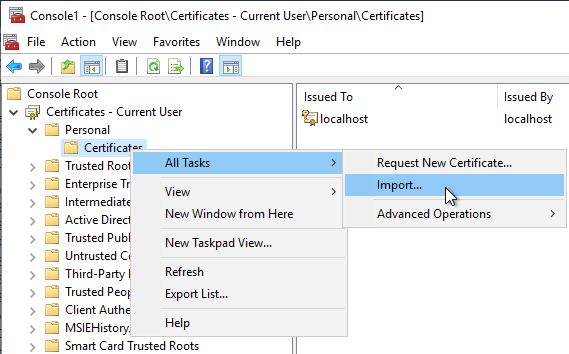
On the machine you want to log in, run certmgr.msc from the Start menu of Windows to open the Certificate Manager tool for the current user. Import the file 01-alice.full.pfx into the folder Personal / Certificates of the Certificate Manager:
Next, switch over to the machine on which your web application runs (if this is the same machine, keep the Certificate Manger open and proceed to the import of the ca.pem file).
On the server, run the mmc command in the Start menu and add the Certificate snap-in. Select the option to manage the certificates for the computer account:

Import your ca.pem file into the folder Certificates / Trusted Root Certification Authorities:

If you now open a site that asks for a client certificate, your browser should let you choose your newly created certificate as a form of authentication.
To accept client certificates on an IIS Express you should read this blog post. IIS Express needs some additional settings that IIS has activated by default.
Conclusion
There are many things that can go wrong with client certificates and only when everything works perfectly can you use your newly created certificate to log in. Thanks to the Gist from Mike we can get all the steps right at the first try.