The Mikado Method: A Great Help to Work With Legacy Code
Earlier this year I read the book The Mikado Method by Ola Ellnestam and Daniel Brolund. Whenever someone describes their process as a
"pragmatic, straightforward, and empirical method to plan and perform non-trivial technical improvements on an existing software system"
I get sceptical. Too many books claim that and deliver nothing. But this process is incredibly helpful, and I wish I found it earlier.
The problem
Every software developer with a few years of experience has endured this situation: You want to make a small change that should take you a few minutes. However, when you start you see one problem after the other you need to fix first, then you need to refactor here a bit and something there, and before you know it, a day has gone by and you are no step closer to implement your change.
That extra work is not complicated, but you try to solve a problem on top of an endless list of other problems. Your tests started to fail right after the second refactoring and after hours of work you would be happy if your code just would compile. The longer this takes, the more frustrating it gets.
A slightly different process
What I like so much on the Mikado Method is that you need only a slight little change in your routine to prevent those problems. It is so easy that you will not believe that this makes any difference. But trust me, it works. The high-level view on the Mikado Method looks like this:
- Set a goal
- Experiment
- Visualize
- Undo
That sounds too easy, right? If we look at the complete flow chart of the process, we see many more parts, but the idea stays the same:
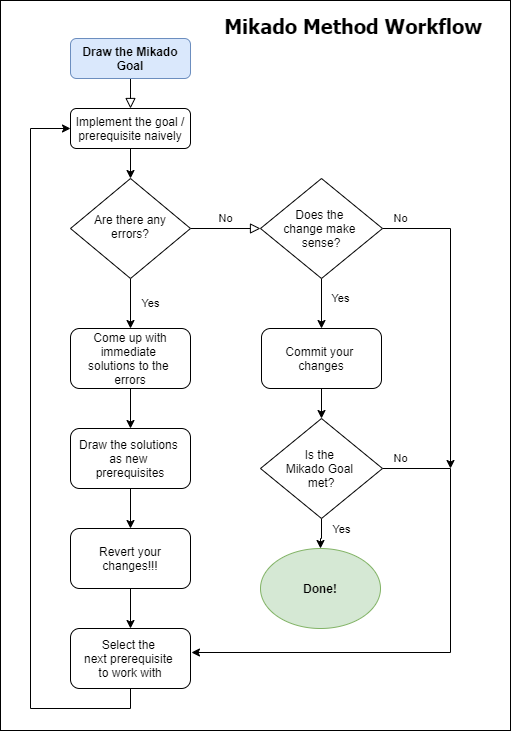
The Mikado Method has its name from the game with the same name. In the game you have sticks worth various points and you try to take out one after the other without moving any other stick. If you move another stick, your turn ends, and your opponent can play. This rule of the game transfers nicely to working with legacy code.
Put it into action
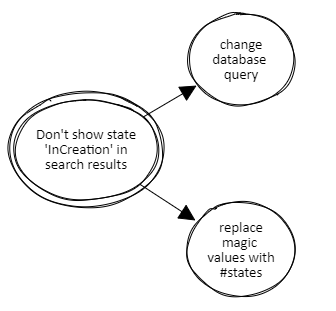
Before you start a change, make sure that you have all your work saved in source control and there are no pending changes hanging around. Now take a sheet of paper, write down the goal of the change you want to make and draw two circles around it.

Now you try to implement this change in the most direct way without caring much about all the dependencies you may run into. This is the naive approach the flowchart talks about. We know that there is most likely more to the change than just to do the bare minimum, but that work will be addressed shortly.
There are two possible outcomes: It works, or it does not. If it works, great! If the code makes sense and looks good, you commit your work, otherwise you clean it up before you commit. You now can mark your step as done and go for the next change. The Mikado Method took slightly more time to write your goal down but otherwise you work as you normally do.
A much more likely outcome of your change is that the direct approach does not work. The compiler tells you that you did something wrong or your tests no longer work. Either way you found out that there is more work that needs to be done. For all the problems you see, you write down what you need to change to make your initial change work (at a high level in just a few words). Each of those newly found changes are prerequisites to your current change. Draw a circle around each of those new changes and draw an arrow from the change you tried to do to the new ones:
Now comes the hardest part of the Mikado method: revert your non-working change. Do not stash it, do not copy it to another directory, revert it and get rid of it. It takes a lot of mental power to throw code away. Do it!
You are back in a state in which your code compiles and your tests are passing. This is the big difference to the usual workflow. You need to adapt your strategy and, thanks to the revert, you can do that on a working code base.
You now can work on any change on your sheet of paper that has no prerequisites (all the circles that have no outgoing arrow). You can work on the change you think will be the easiest to make some progress. You now try a direct, naive implementation for this change. If it works, you clean your code up and commit that change. Then you go to another change without prerequisites and repeat this step until everything is implemented.
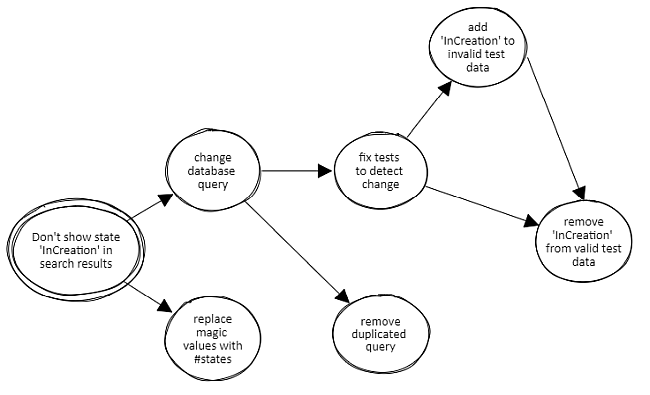
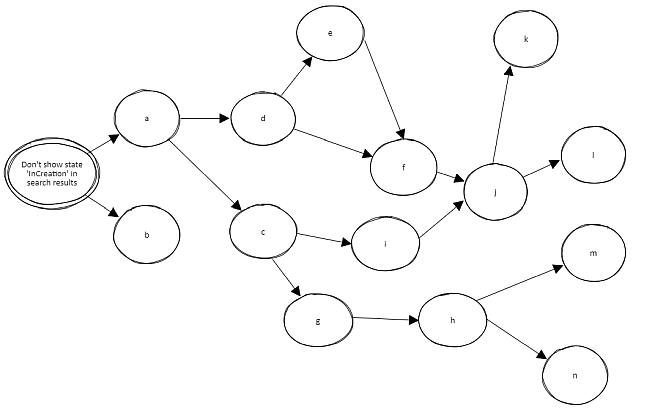
If you find new problems, you write them down, circle them and draw arrows to show that those are prerequisites of your current step. Depending on how complicated your work is, this graph may get large:
How does the Mikado Method help?
You can keep doing your work nearly unchanged and still profit a lot. How is this possible? The step where you throw away the non-working change makes all the difference. Thanks to this counter-intuitive action you always have a working application when you start a change. You can focus entirely on the change at hand and get immediate feedback if this change works or not. There is no guessing that it may work as soon as the other changes work as well. You know what you changed, and you get immediate feedback within seconds (or minutes) and not hours. This allows you to work much more efficient and without keeping all those changes in your mind.
Unintended benefits
If you solved all prerequisites for your change, you can make the change without any problems. This allows for smaller commits that are simpler to understand and easy to communicate with your team.
You gain a lot of knowledge by creating the graph with all the dependencies of your change. While you can work your way backwards and get the change done as you intended, you may have an epiphany for a better approach. If this happens, you do not have to stick to your initial plan. You only committed changes that work and make sense, so you do not need to undo your changes to start a new approach.
Communicate with stakeholders
The graph you create shows at the end all the work that had to be done. It was not just a simple little change, but more a big adventure because the code base was not in a state that allowed to easily change it. If that happens often, you have a very useful graphical representation of what it means to “just add this little feature”. This will help you to talk about technical dept in an understandable way, then everyone can see that a sheet full of circles is a lot more than just a little change.
Why not just a to-do list?
As long as all your tasks only have one dependency you may be able to get the same benefit out of a to-do list. However, as soon as you have multiple dependencies per task, a to-do list reaches its limits. There is no easy way to show the dependencies and you need to come up with your own system. Instead of inventing that, use the Mikado Method that already has a solution for this problem.
The book
If my rambling caught your interest, buy the book "The Mikado Method" by Ola Ellnestam and Daniel Brolund, published by Manning.com, ISBN-13: 978-1-6172-9121-0:

Conclusion
I find this approach with small steps on a working code base a huge improvement for my workflow. I got my fair share of opportunities to put it into action and so far I never regretted it. If you have to work with legacy code I suggest you try this method.