SonarQube: Installation Walkthrough for Windows and SQL Server Express
The installation of SonarQube is well documented and easy to follow. However, SQL Server Express brings its own challenges. There are some configuration changes you must make or SonarQube will not work. This installation walkthrough will address those issues and help you to overcome them.
This post is part of the SonarQube series. You can find the other parts here:
- Part 1: SonarQube: Installation Walkthrough for Windows and SQL Server Express
- Part 2: Collecting Data on your Projects with SonarQube Scanner
- Part 3: Start Analysing Code with SonarQube
- Part 4: Fine-tune the Collection of your SonarQube Projects
- Part 5: How LOC is computed in SonarQube, NDepend and Visual Studio
- Part 6: Customise the Rules in SonarQube
- Part 7: Get SonarQube Ready for Production
- Part 8: Integrate SonarQube with Visual Studio Team Services
- Part 9: Integrate SonarQube with Visual Studio using SonarLint
- Part 10: Leverage SonarQube to Fix Technical Debt in Multiple Projects
Prerequisite
The only prerequisite for SonarQube is Java. You can use the Oracle JRE or OpenJDK in version 8 or newer. The version from Oracle can be found at Java.com.
The hardware requirements should be easy to meet with 2 GB of RAM. The disk size varies by the size of the projects you want to analyse, but a few GB should be enough.
Download SonarQube
The download page offers you two options:
- The current version (called LATEST)
- The long-term supported version (called LTS)
If you start fresh and intend to upgrade SonarQube on a regular basis, then LATEST is a good place to start. If you need a version that is longer supported or doesn't change that often, then the LTS version may be a better fit.
Whatever version you choose; you download a *.zip file that can be extracted at a suitable location. If you want to run it as a service, then the package should be placed somewhere where the service user can access the files. To make things simpler in the next parts, I refer to the folder you extracted the SonarQube *.zip as the installation directory.
Create the Database
SonarQube works with various database systems. For Microsoft SQL Server is the right collation important. Pick one that is case-sensitive (CS) and accent-sensitive (AS) like Latin1_General_100_CS_AS. This script shows you the collation of your database, should you not be sure what collation is used:
Configuration
In the installation directory (the place where you extracted the *.zip file) you find a folder named conf that itself contains the sonar.properties file. Here you can configure the various parts of SonarQube. The only part that must be changed is the sonar.jdbc.url property in the section that matches your database.
It's possible to use username and password instead of integrated security. In this case you comment out the sonar.jdbc.url property, add those lines to the configuration file and set the values for your installation:
SQL Server Express
The next step would be to start the SonarQube server from the bin folder in your installation directory. However, when you use SQL Server Express the server will start, wait a bit and then stop. The lack of log messages makes it hard to figure out what is going on and changing the log level to trace doesn't help.
A lot of magic happens when you use the .\SQLEXPRESS in the connection dialog of SQL Server Management Studio. By default, the Express edition uses dynamic port assignment that is well taken care of in the Microsoft driver. However, you try to connect with a Java application that doesn't do that magic.
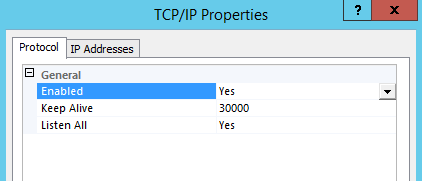
Open the SQL Server Configuration Manager (a separate tool not to confuse with the SQL Server Management Studio or, depending on your version of Windows, a snap-in for Microsoft Management Console MMC) and expand the item "SQL Server Network Configuration". It contains an entry "Protocols for SQLEXPRESS" that needs to be selected. Next enable TCP/IP in the panel on the right side.

Next double-click the "Enabled" property to open up the TCP/IP properties dialog and scroll to the end to the IPAll entry. There you need to remove the value of the property "TCP Dynamic Ports" and add 1433 as the value of "TCP Port". Save your changes and restart your SQL Server Express.

You can check if all worked when you open the SQL Server Management Studio and use the . as the server name:
If the connection to your SQL Server Express instance works, you can start SonarQube. Otherwise go back and check the TCP/IP settings again.
Start SonarQube
In the bin folder of the installation directory are the start-scripts for the different operating systems. Open the one that matches your installation and execute the script StartSonar.bat to start a console that should stay open.
Open https://localhost:9000 in your browser. SonarQube should be loading and then display you an empty screen:
 ](SonarCube_Start_full.png)
Congratulations, you now have a working SonarQube installation.
Next
Running SonarQube is nice, but without analysed code it's rather useless. The next post will explain how you can use the SonarQube scanner to analyse your project and add data to SonarQube.