Integrate SonarQube with Visual Studio Team Services
Running SonarQube manually is a sure way to not running it at all. Sometimes you forget it, other times you know that it's not going to give an "adequate" report and so you better wait a bit with the next run – the only problem is that this next run never happens. If you want to take SonarQube seriously, you must integrate it into your build. This post shows you how you can use SonarQube with your Visual Studio Team Services (short VSTS) builds.
This post is part of the SonarQube series. You can find the other parts here:
- Part 1: SonarQube: Installation Walkthrough for Windows and SQL Server Express
- Part 2: Collecting Data on your Projects with SonarQube Scanner
- Part 3: Start Analysing Code with SonarQube
- Part 4: Fine-tune the Collection of your SonarQube Projects
- Part 5: How LOC is computed in SonarQube, NDepend and Visual Studio
- Part 6: Customise the Rules in SonarQube
- Part 7: Get SonarQube Ready for Production
- Part 8: Integrate SonarQube with Visual Studio Team Services
- Part 9: Integrate SonarQube with Visual Studio using SonarLint
- Part 10: Leverage SonarQube to Fix Technical Debt in Multiple Projects
Which build to choose?
Running SonarQube with every continuous integration build is possible, but does this really create a benefit? A nice feature of SonarQube is the diff to previous version, but building too often will render that feature meaningless. A sweet spot between multiple runs an hour to never is for me a release build. That build definition you run to create all the artefacts and deploy your code to your test system. All those potential shippable increments should have enough business value to talk with your customers. That too would be a good time to check how your quality is doing and if you need to make adjustments.
If you disagree with my reasoning, you can integrate SonarQube in whatever build you like. It should help you and you know best what you need.
Extend your build process
To get a supported version of SonarQube in Visual Studio Team Services you need to add the SonarQube extension from the marketplace.
When the installation is completed, go to your project in VSTS, open your build definition and add a new task. If you search for sonar you will get a few tasks as a result:

If you use MSBuild to build your projects, then add the two non-depreciated tasks to your build process. The task "Begin Analysis" should go before you build your projects, while "End Analysis" should be placed somewhere after your tests are executed. This will ensure that the code coverage report of your unit tests will be included in the SonarQube analysis. You can drag those tasks to their place until it looks something like this:

I like SonarQube, but I don't want to stop a release just because SonarQube isn't running. When you agree with me you can check the option "Continue on Error" in the Control Options of both tasks. Don't do that when you enforce quality gates. Not meeting them will result in an error and this option lets you proceed – it can't figure out which errors can be ignored and which should not.
Add a SonarQube endpoint
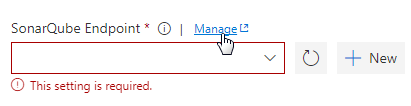
Most options of the "Begin Analysis" task are the same ones as you would use with SonarScanner. The big exception is how you configure the location of your SonarQube server. You need to add an endpoint and the simplest way to do this is to click on the "Manage" link:
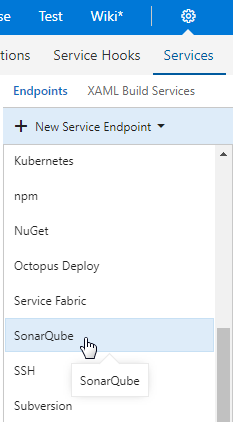
This brings you to the list of service endpoints of your current VSTS project. You can add a new one and select "SonarQube" as the type:
The endpoint needs a name, the URL of your SonarQube server and a user token:
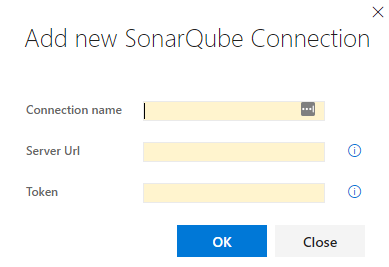
In the last post I explained how you can create a user token should you not have one ready to enter. The token is bound to a user, what gives you the possibility to cut the connection by simply revoking that token.
If this endpoint is created, switch back to your other browser tab and select it in the list of endpoints. Save your build definition and queue a new build to check if everything runs as expected.
Excluding files
The MSBuild task knows a lot more about the specialities of a .Net project than the SonarQube scanner. Therefore, you most likely won't need to manually exclude files and folders. Should you need to make some adjustments you can open the "Begin Analysis" task, select "Advanced" and add your exclusion list in the "Additional Settings" box. Here you need a slightly different syntax than in the examples with the properties file for the scanner:
Add all directories and files you want to exclude. When your list is complete, click on "Save and queue" to start a new build. Repeat this until you are happy with the exclusion list.
Repeat for each project
Every build you want to run SonarQube needs the same modifications. You can open a second browser window to copy the values from one task to another. However, every project needs its own service endpoint. If you create a different user for each project you will be able to block a single project should the user token be shared too far. It's more work at the beginning but may safe you a lot of time later – otherwise you need to change every endpoint and not just the compromised one.
Next
Tracking the quality of your code is nice, but it will not be enough to improve it. Your developers must get quick feedback on how their newly written code affects quality right where they write it: in Visual Studio. The next post shows you how SonarLint can bring your SonarQube rules to Visual Studio.